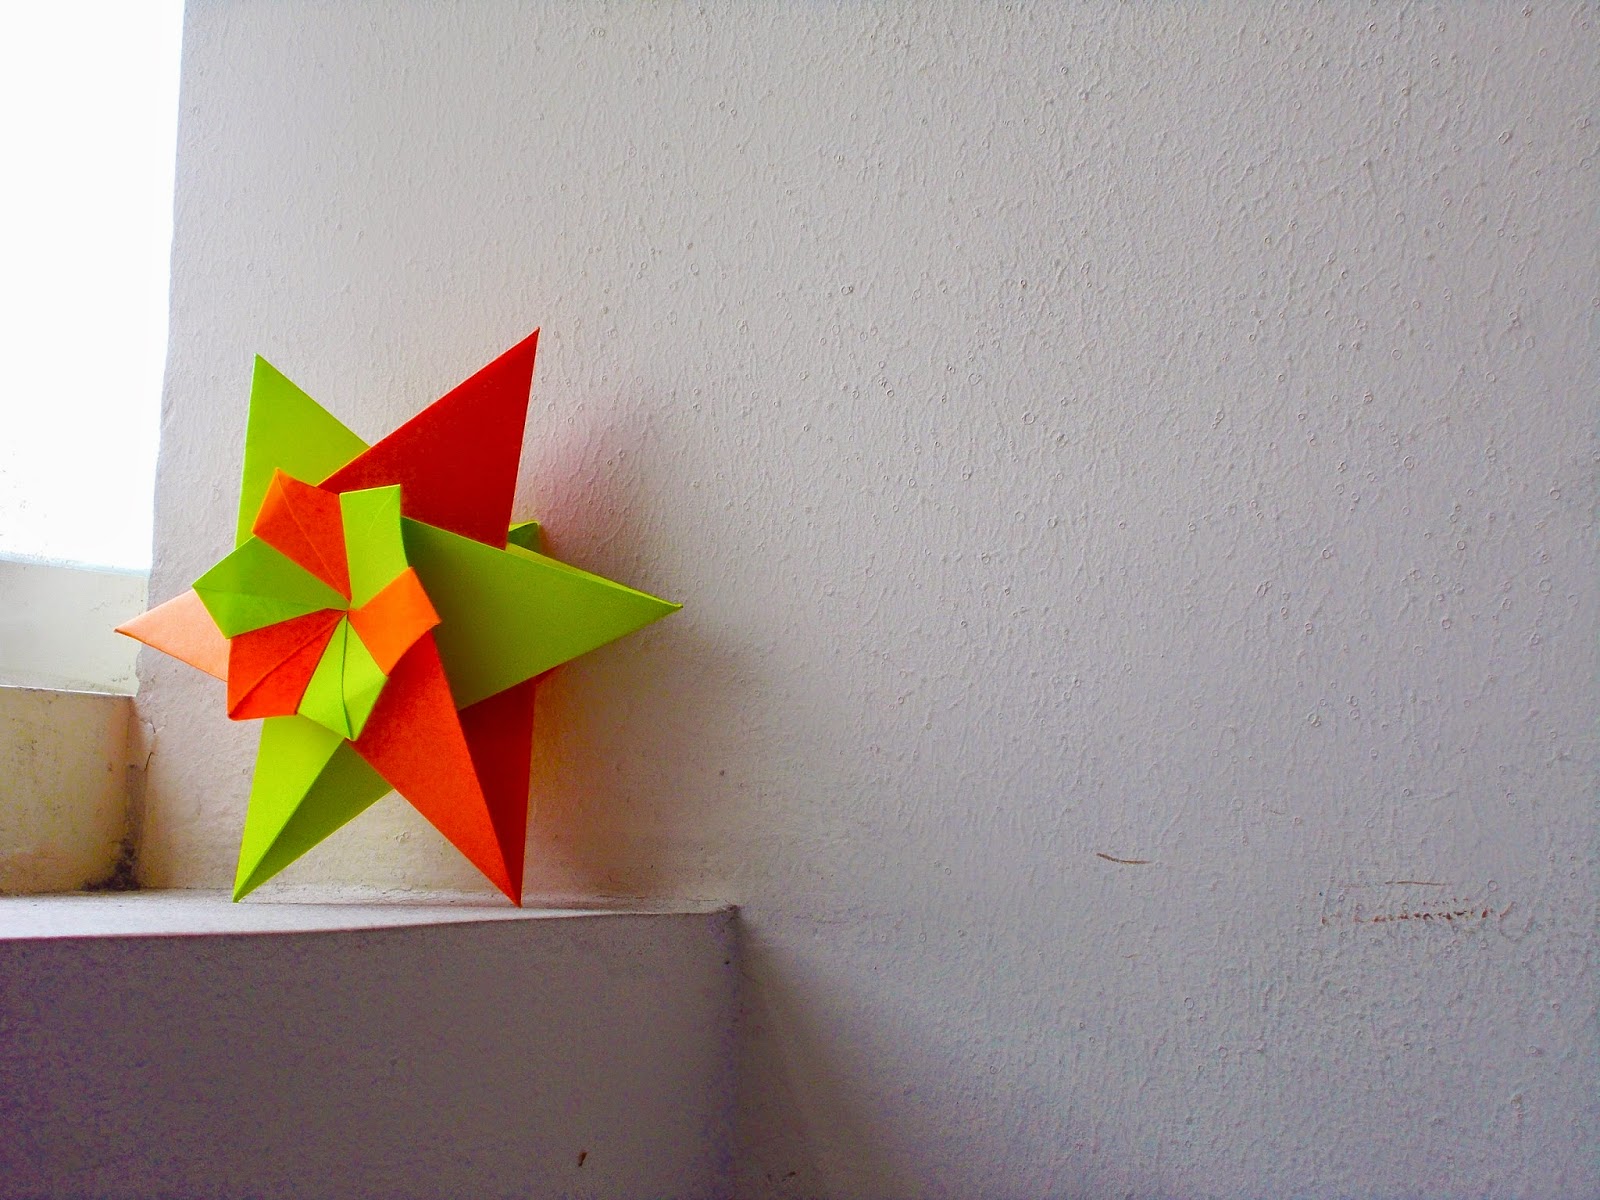
Showing posts with label Star. Show all posts

Tuesday, December 16, 2014

Star Franziska

9


Now the 9th model for our countdown: Franziska Star or Stern Franziska, designed by Carmen Sprung with diagrams published in "Origami: 21 Sterne".
The star in the photos is made from 6 units. You may choose from 5 to 8 units. (I just find the 6-unit star cute...hahaha)

Monday, December 15, 2014

Stella Pitti

PS Note: It has already been a LONG TIME ever since I have posted :P Here is why:
1. Me and my group mates went to Japan to participate in the 2014 Asian International Children's Film Festival to present the Philippines (our film was chosen and it was a privilege!)
2. My pointing finger of my right hand got rotten on the upper part and I had it operated on. Right now I am still taking medications. (It was painful as hell...but of course not as painful as giving birth to a donkey...maybe).

3. SCHOOLWORKS and ASSIGNMENTS....took me AT LEAST A WEEK to finish them all...

Well now you know my rise and eventual fall...2 times....ahahaha

Well, starting with this post, we are starting the 10 DAYS BEFORE CHRISTMAS! In this blog, there will be a countdown with December 15 (today) being number 10 and December 24 (Wednesday) being number 1, with one origami model per day (and can be used as a Christmas decoration or something). Then on December 25 there will be a SUPER SPECIAL POST dedicated to Christmas !


Let the countdown BEGIN!

10


This is Stella Pitti (I don't know where he got the name either), designed by Francesco Mancini, with the diagrams published in a booklet named "Mancinerie" (which is also his screen name). But, when you do not have enough money to buy the booklet, fear not! (wut) I found video instructions by Sara Adams on this model posted on Youtube, and it is through that video I learned making it. A cute model to go with any Christmas Tree! (Especially with foil paper, though I haven't tried it yet)

What do you think is featured as number 9 in the countdown?

Happy Holidays!

--ABonymous--

Saturday, October 25, 2014

12-Point Star

This Star is designed by Peter Keller, and the diagrams can be found in his Flickr page. (I am not sure if the diagrams are still there...)


The design looks quite like Carmen Sprung's Star Katharina, but the problem is I'm too poor to buy the book and see if the processes are similar too...

This model is the "origami that shrinks to atomic size even when folded from a country-sized paper" type...if you want a star that is big, then use some big paper. Here in the Philippines big paper is kind of rare...but there's this big paper that is so big but a bit thick that you can buy here. Locals call it "cartolina."

Another thing that's cute about this star is that it stands on its own. People will be like, "oh look that star is so d@mn cute" until they accidentally knock it off the table and send it burning down the pits of hell. Just joking...

Nevertheless, it is a great-looking model that may or may not be easy for beginners. I do not use levels of easiness in this blog anymore since the easiness of a model really depends from person to person, just like opinions...well, they ARE parts of opinions.

Wednesday, April 30, 2014

Nobuko's Puff Ring / December Decoration

In the origami world, if 2 origami artists invent the same design independently, they both equally share the rights to that design. One case of this is the Nobuko's Puff Ring for Nobuko Okabe, or the December Decoration, for Jose Meeusen.

You can find the diagrams in either Creased Magazine Issue 12, or Easy Origami to Enliven Your Life (Kurashi o Irodoru Raku Raku no Origami) Book by Tomoko Fuse.

When making thie units of this model, I advise you NOT to use small paper; anything smaller than a 4 inch x 4 inch is a no no. Why? Because it'll be hard to assemble and your model will look very crappy. Plus, the locks will be weak.

The units are easy to make, though, The units are just modified preliminary bases.The assembly is also a bit easy, though if you do not lock it meticulously, it will fall apart.


Plus, you get to "puff" it up just by pressing the model a bit.


Thursday, April 3, 2014

Palleas Box

This is designed by Peter Keller. The steps can be found on his flickr page.

This "box" can be very convenient, except
1. It cannot open properly
2. It is not a box.

Such irony. Anyway, it still makes a cute decoration, being a chubby star like its mortal enemy, the TSU, and it has a wee little flower at the middle.

Kudos to my sister for helping me color the paper since she wanted to. XD


Saturday, February 22, 2014

Star Doris

This star is designed by Klaus-Dieter Ennen. You can find the tutorial at happyfolding.com (Sara Adams).

When I decided to make this star I thought it was modular. So, I started with a 4 X 4 inch square paper. I muted the tutorial video, since my computer has incredibly loud speakers even though it's at a low percentage, and it's so early in the morning so I do not want to wake up my sister from her adventures in dreamland. Which means, I did not know it was single-sheet until the end of the tutorial.

But, I really liked the star so I made another (larger) one with kami brought by my aunt from the United States. (Thank you aunt! :)) The paper was stiff, making the star open up a bit. But the results was awesome! :D


The star is easy-medium, though there are parts where you have to be careful, or else you will rip the whole thing up. What a waste.....

Monday, December 23, 2013

Mennorode Star

This origami model is designed by Carmen Sprung.
It uses 12 rectangles of specific ratio and proportion. But, preparing the rectangles need cutting off an edge. Such action makes many people think that the Mennorode Star is not origami anymore.
Well, IT STILL IS. Remember that you are just shaping the paper. It’s like preparing a square from a rectangle. Only internal cuts are not allowed.
When you make the 12 units, you cannot assemble them into a star just yet. The units must be paired (resulting in 6 pairs.) One pair will be assembled into a bimodule. The 6 bimodules will be assembled to form the star. Wew, think about complex assembly.
Making the units and assembling the modules and bimodules are easy, until you have to connect the 2 ends to form the star. This point can be confusing, especially when the paper is too tight. But, once you get the hang of it, making the star can be very addictive. Lel…..I have already made 12 stars.
This star works great as a Christmas Decoration, especially if you use green and red paper. To achieve the star’s best effect, use 6 rectangles for each color (if you use 2 colors.)
image
image
(wew….brings so much memories of my stay at our beach house….the sun…the sand…the radioactive jellyfish…)
Sprung has posted the diagrams for this star. http://www.origamiseiten.de/diagrams/Stern_Mennorode_neu.pdf
But if it can be confusing, there are instructional videos in youtube.

Oriland Magic Star

This beautiful but head-aching action model is designed by Yuri and Katrin Shumakov, the creators of ORILAND.
There are many ways to fold this star, either by only one piece of paper, or using multiple sheets of paper. I chose the modular version, since folding the one-piece version will leave my hands shaking violently like the hands of a person with Parkinson’s Disease while standing on the roof of a squatter’s house during a 7.5 magnitude earthquake.
Anyway, The star is very beautiful. It is an action model, like Yamauchi’s fireworks. But, the Fireworks is  A LOT easier than folding the Oriland Magic Star. Just folding the units of the Oriland Magic Star will leave your head aching. The results are nice, though.
image
This is certainly NOT a good model for beginners, but if you want a model like this, Yamauchi’s Fireworks is a good start.
The ebook can be bought from their website
http://oriland.com/

Rosita's Star

This is designed by Rosemary Lyndall, so I have no idea on who the heck is Rosita.
PS. If I accidentally misspell some word, well blame it to this piece of sh!t I call a “keyboard.”
Well, going on with this model, this is a very unique star. It’s like a 4-pointed star with some swirly ice cream thingy in the middle. It’s also easy to make. I recommend this for those beginner origami artists who want to make an unusual model.
image
The diagrams are in Lyndall’s website: http://berrylyn.blogspot.com/2010/01/rositas-star.html

Negative Space Stars Tessellation

This is designed by Eric Gjerde, and the instructions can be found in his book “Origami Tessellations”.
This tessellation is unusual compared to the others, since it does not have any twists or pleat intersections (other than the 60-degree pleat intersections forming the hexagons, but you can still eliminate them to create an appropriate tessellation).
It’s called “Negative Space Stars” since you have to hold it against the light to see the stars that cannot be seen when it is not back-lit.
What can be irritating about making this model is that you have to make a LOT of offset creases. But, in order to make a “not-junk” masterpiece, you have to fold the offset creases properly. This is the type of tessellation not appropriate for lazy bastards out there.
This has also become one of my favorite tessellations.
image
image
In the book, this is labelled as “advanced”. Well, because of the creases and the techniques, I have to agree this is a bit difficult.
I love how the tessellation forms a ring around the center star, and there are 6 rings intersecting the middle ring.
This is my 22rd tessellation, and my 2rd “advanced” tessellation, :D

Field of Stars Tessellation

This is a tessellation designed by Eric Gjerde, and the diagrams can be found in his book “Origami Tessellations.”
Apparently, it is categorized as “advanced" in the book, though it is actually easy to make.
The tessellation has a star twist in the middle, surrounded by other complex designs.
When put to the light, it looks like a spider web clinging to a star, or maybe not.
Because of it’s great and web-like design, this became one of my favorite tessellations.
image
image
For the difficulty rating„,well you know my style……..I’ll give it a 5.
It has been used in the original cover of “Origami Tessellations.”
image
(courtesy of Desma 22)
Well it wasn’t used since Gjerde described the cover as “old-style.”
So that’s all I got to say…..

Star Twist

This is designed by Eric Gjerde, and the diagrams are found in his book “Origami Tessellations.”
Although it is in the book, I do not think this can be called a tessellation since an origami tessellation can be a repeating pattern (like the normal ones we see everyday) or the ones that we call “recursive (the same model design appears in a smaller scale in the middle and so on, like the Hydrangea). Such characteristics cannot be seen in this model.
image
Then why is the snowflake/flower-like thing in the Origami Tessellations book? Well, it is because this model can be tilled to form an appropriate tessellation. (Note: the hydrangea can also be tilled, but a single unit can already be considered as a tessellation itself).
image
image
So, if you have only folded the snowflake-like one (the light blue one), then you did not fold the tessellation itself. It’s why it is labelled as intermediate in the book; tilling the model can be hard work unless you know the right technique.
The model is composed of hexagon twists, 60-degree pleat intersections, and 120-degree pleat intersections arranged to form a star with a spiral-like thing in the middle.
Note: Eric Gjerde was able to tell a hint on how to tile the model in the book.

Fortunate Star

This is one of my designs.
I named this after my grandfather (Fortunato) who died August of 2013. Lolo, I miss you :’(
This star is made from a hexagon, and its way of shaping into a star is very similar to the finishing touches of the Blutenkreisel (C. Sprung) yet these two models are very different.
I tried to reproduce this star before, but I got some steps wrong. Because of that, I was able to create the Star Traia, which I will feature later in this blog.
image
This is also created from another star. The other star will also be featured later on.
I wasn’t able to make any diagrams for it yet since I can be very busy during this times of the year.

Polaroid Star

This is one of my designs.
This is also my second model that I designed, so I have no idea why I posted the Star Chocola first. :P
This is also pretty easy to make.
It reminded me of the Polaris Star hovering above the North Pole like a bee attempting to rape its victim. Then, after that thought, the brand of some old camera came to me.
And that’s why I named the thing “Polaroid”
image
I also made the diagrams already. Here it is….
image
.PS: None of you copycats out there EVER post or share the diagrams WITHOUT MY CONSENT OR APPROVAL.

Star Chocola

This is also one of my designs.
How I got the name? (You would probably not care anyway XD ) Strangely the star reminds me of chocolate. Then this chocolate chips delicacy named Chocola came to mind.
The model is pretty easy. It’s similar to a waterbomb base sandwiched between 2 preliminary bases. So, it’s SUPER EASY to reverse-engineer the thing.
image
But I’ll post the diagrams in this blog anyway

Star Puff (Ralf Konrad)

This particular Tessellation is designed by Mr. Ralf Konrad.
This tessellation, although it is labeled “beginner” in the book “Origami Tessellations”, i think it is more of an intermediate model.
From afar, it looks like it is made of porcelain or glass or something smooth. The name also reminds me of food. :P Yum yum……
image
This complicated model’s diagrams are found in the book "Origami Tessellations" a. b. Eric Gjerde. Note that in the book, the crease pattern is wrong.
There is also a simpler version of the “Star Puff”. I didn’t see any diagrams but there are many video tutorials of it. I recommend the video by happyfolding (Sara Adams) though.
By the way, I also photographed it with light behind it…..
image
It looks like it just came straight from Mordor or something like that. XD
This is my fifth tessellation. I forgot to post my fourth one so just wait for it.

Robin Star

This is another famous model designed by Mrs. Maria Sinayskaya.
If you are experienced in origami, this is a piece of cake. Plus, it only needs 8 units. This is A LOT simpler than that “Spring Into Action” model. (once again, no offense Mr. Beynon).
Just look at it. It looks like a flower which was shot by a giant caliber bullet or something in the middle………so cute. It’s also really sturdy……it’s not the type of origami which would just explode violently when brought anywhere. I once made a different star from another designer (I will not state his or her name). The star was actually beautiful. But apparently, like the poor trashy origami it is, the last time I saw it, the units were everywhere, as if a bloody origami murder had taken place.
What do it think it is? A bomb? Fooh!
imageAnyway, here are the diagrams on Mrs. Sinayskaya’s website:
http://goorigami.com/diagrams/robin-star

UPDATE: Mrs. Sinayskaya just released the diagrams for her "Robin Star ver. 2" on her blog.

60-Degree Star

This is designed by Mr. David Petty. Sadly, Mr. Petty died on December 3, 2011. Rest In Peace, you will always be remembered. :(
This star is made from only 6 pieces of square paper.  It also is not very hard to accomplish.
I remember taking this picture….it was SO hot, and I was literally BURNING. Luckily the model did not burst into flames, or all you will be seeing is a pile of ashes with the words “SUPER EPIC FAIL” drawn onto it, just like the Jitterbug.
image
There are also diagrams in the internet, yet when I visited the website where I got the diagrams recently, the website was destroyed in a way I cannot explain, just like what happened to the website of the Jitterbug.
Wow, this Star and the Jitterbug have a lot in common.
Anyway, here’s a video from Origami Maniacs:
http://origamimaniacs.blogspot.com/2012/09/6-degree-stars-by-nick-robinson.html
A shout-out to Origami Maniacs: Its 60, not 6, and it’s DAVID PETTY who designed it; Mr. NICK ROBINSON just did the diagrams. Wew.
Just making things clear. :D
Once again, RIP David Petty. :’(

Sternblute

This is a well-known model created by another genius in the world of origami. Her name is Ms. Carmen Sprung.
Somehow, you can also manipulate the number of units, just like the TSU, but there are some limits.

1) The range of units are from 5 to 8.
2) You can only create a star which somehow becomes more 3-D when you lessen the number of units.

The English translation of “Sternblute” (it’s in German) is Starflower, even if the 8-unit version only looks like it and the thing looks more like a miniature wormhole about to suck you up and spit you out in another dimension.
There’s another name for it, and it’s Sterntaler. I do not know what it means, so let’s pretend its the name of a spaceship about to do a cartwheel in the black void of freaking space.
image

The diagrams can be found in this link: http://www.papierfalten.de/documents/faltanleitungen/8er_sternbluete.pdf

There are also diagrams in Sprung’s book “Origami: 21 Sterne,” yet the price was higher than a man who smoked marijuana, peyote, and any other illegal drug combined.
Such a pity, it really is a nice book……oh well.

The TSU Series


"That Simple Unit" is designed by the great Charles Esseltine.
It is called “That SImple Unit” (TSU for short) since you can make ANY shape or polyhedra you want. But, some polyhedra requires a BIG number of units, bigger than the number of people who considers McDonald’s as a healthy breakfast (yes, I myself did not even know what I mean).
The lucky star-like thingy in the photograph below uses 15 units. Sounds big, right? (If it doesn’t, then fine, you’re good at origami.) Well there is this cross-like thingy which uses a freaking 31 units (If this still sounds small to you, then fine).
image
This Star reminds me of a chubby colorful thingy which will explode upon contact. Just look at it! All it needs is a glowing, spooky aura….
Oh yeah! The instructions. Just press this link.
http://web.archive.org/web/20060330001742/www.anniefolds.com/TSUstepfolds.htm
Even though your hands will probably shake non-stop like a chihuahua, the results will be very rewarding.
And oh yeah, when you bring this thing to the beach (why would you bring this to the beach?) do NOT put it in the sand, or else you will be spraying sand all over everything when you bring the star up again. Just think of maracas with holes in them, making them pretty useless and trashy. Yep, just like that.
Related Posts Plugin for WordPress, Blogger...